Wednesday, November 30, 2011

Lesson 13 Polarized Light

Use of Polarization on a Cheap Pastry


Use of Polarization on a Person

Production Stills by Dave Brown


Assignment 13

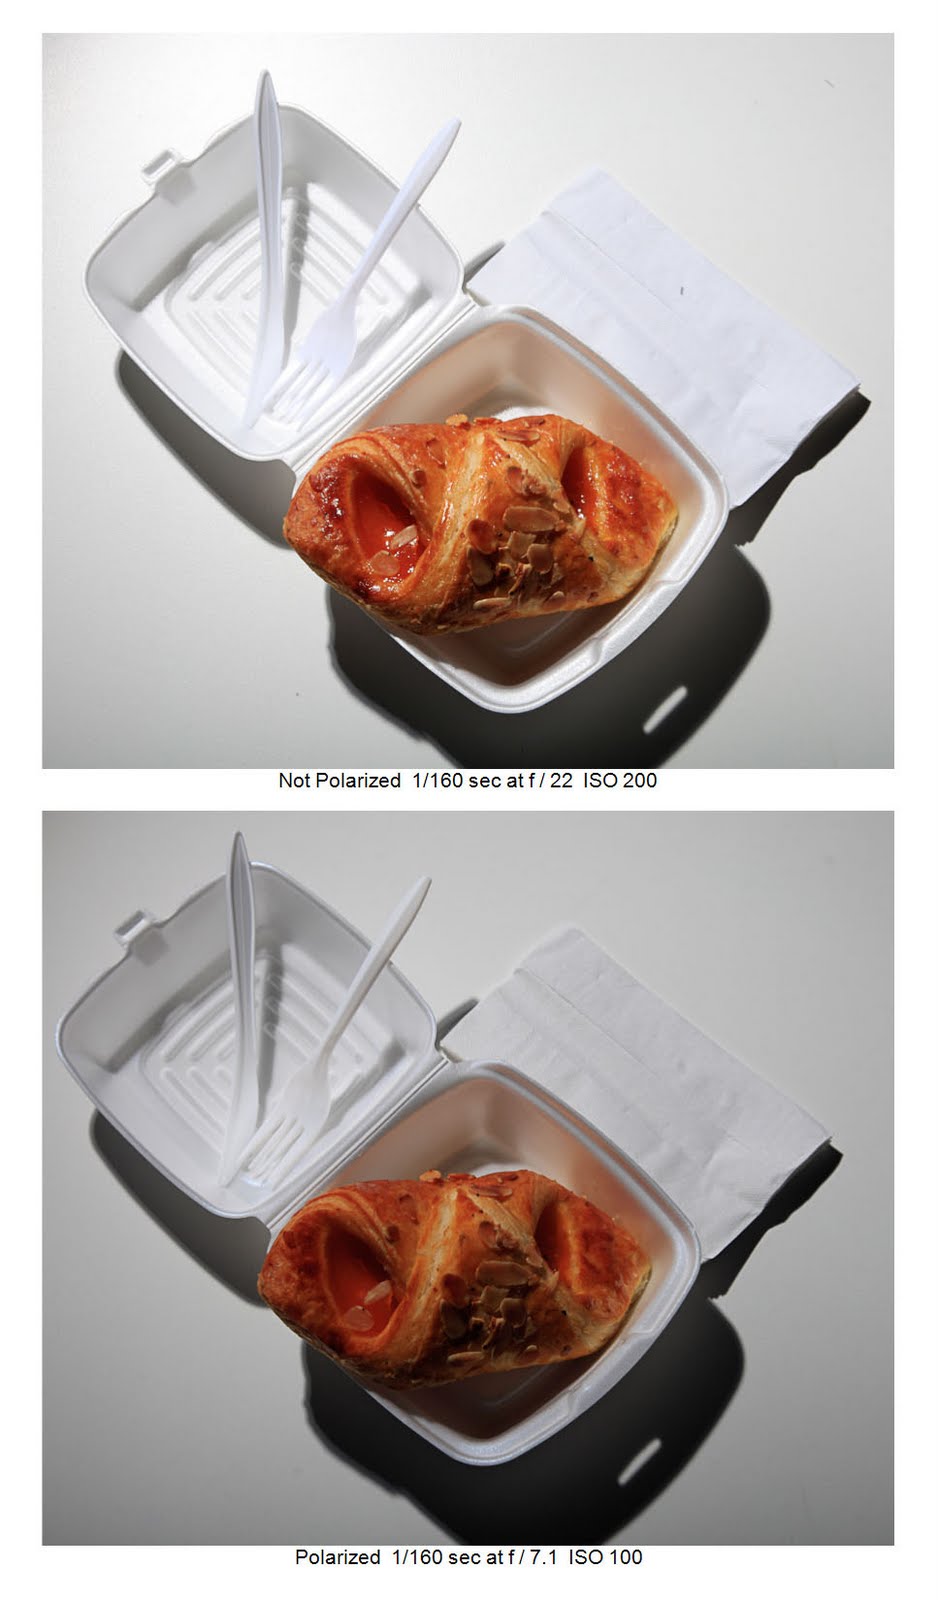
1. Photograph something or someone with the Ellipsoidal spot light, the Kodak Pola-Screen and the 77mm circular polarizing camera filter. Post 2 images side by side showing the effect of polarization and non polarization.

2. Post a photograph that you like the lighting and that you wish to emulate. Sketch out how you think it was lit. You can use this file to make your sketch:
http://www.diyphotography.net/lighting-diagrams

Wednesday, November 23, 2011

Lessson 12 Night Photography

Brassai
https://www.google.com/search?q=Brassai&hl=en&rlz=1T4ADFA_enUS432US433&prmd=imvns&tbm=isch&tbo=u&source=univ&sa=X&ei=_fXMTvOHLIP00gGHnIlM&ved=0CFAQsAQ&biw=1195&bih=846

Michael Kenna
http://www.michaelkenna.net/


Frank Relle
http://www.frankrelle.com/gallery2011a/index.html

Chris Callis


Assignment 11 Night Photography
Go outside between dusk and dawn using whatever existing light is available recognizing its color and mood, make a photograph that is surprising by what it reveals.

Wednesday, November 16, 2011

Lesson 11 Still Life

The photograph on the left was made by sitting the bottle on our light table which was lit underneath with a small soft box. From behind and at the background curve another small soft box used. A matt silver reflector was placed above and to the front of the bottle to light the top of the wooden plug. By placing the bottle on a black piece of foam core and another piece used for a background, we were able to create another version with a black ground and background. The expose was increased by a full stop.


The pencil sharpener with lit with a single small soft box to the left and was set on a 4x8 sheet piece of grey Formica that was placed on top of the light box set up.


The four images I used as layers to achieve the final image above. The upper left image was out of alignment and I used Edit Auto-Align in photoshop to get it to work. I changed the shape of the black reflection in top right image by masking out the sharp edge and replace it with the image from the top left.


Production Stills by Phillip Mansfield


Assignment 10 Shiny Metal and Glass

Photograph a Shiny Metal object and define its shape and characteristics by use of it reflective
qualities.

Photograph a glass object and define its shape and characteristics by using its transparency.

Wednesday, November 9, 2011

Assignment 10 Light Painting

Light Painting with Continuous Light
Multiple Capture Layered in Photoshop
Production Stills by Jessica Azizi
Relay Mode Pages from Pocket Wizard Catalog

We learned how to remotely trigger the 5D MII by using a special cable called the Canon N3 to mini phone by connecting the N3 side to the Canon's remote control terminal and the mini side to the Pocket Wizard II's camera port. By setting another Pocket Wizard Plus II to the same channel as the one attached to the camera, the camera shutter can be released by the remote Pocket Wizard Plus II when you press the test button. For light painting with a continuous light source, we set the camera at a long exposure (20 secs) and trip the shutter remotely when ready to start painting. The room has to be dark enough that it doesn't pick up any stray light during the long exposure. The f stop and ISO are determined by trial and error. With practice a rhythm will develop your painting skills.

The set up of the Pocket Wizard Plus II's for light painting using a flash, is an extension of the continuous light setup. This time we put the camera's Pocket Wizard Plus II in the hot shoe of the camera. The cabling remains the same. We need a third Pocket Wizard Plus II to be attached to a Canon 580EXII (this is the only Canon flash with a pc connection) using a pc to mini cable. The pc end is inserted into the flash's pc terminal and the mini end is plugged into the 3rd Pocket Wizard Plus II's flash terminal. The 3rd Wizard has to be set on a channel that is one number higher than the other two Wizards. The 580EXII is set on manual and the power is set my trial and error. The four factors determining the exposure for each time we flash are subject to flash distance, f-stop, ISO and power setting on the flash. Now we have the 580EXII and 3rd Pocket Wizard Plus II in one hand and the remote camera firing Pocket Wizard Plus II in the other. As we point the flash where we intend the light to land, we push the test button on the 1st Wizard and it trips the shutter and then automatically uses the pocket wizard mounded in the camera's hot shoe to sync with the flash that is set on the next higher numbered channel. The subject needs to remain perfectly still and then as many captures from as many positions of light as needed. In Lightroom, the captures are selected while in Library Mode, right click on one of the selected images, "edit in" and go to bottom of the list to "open as layers in photoshop". Once in photoshop you can use lighten in the blending modes on each layer to have all the lights turned on. Now it is time to make decisions as to how you work with each of the lights. Have fun and be brilliant.
Assignment 9 Light Painting.

Make a photograph using flash as a
painting tool.2.
Make a photograph using a continuous light source as a
painting too.
Plan what you want to achieve with light painting. The
lighting scheme should be hard to achieve conventionally.

Wednesday, November 2, 2011

Assignment 9 Dedicated Flash

Santa Con 2010


Halloween 2011 85mm f1.2 @1/15 ISO 1600

Test of the Dedicated Flash

Various Forms of Light Modification


Production Stills by Jessica Bandy


Assignment 9 Dedicated Flash Canon System

Use direct flash on camera Priority setting
Use direct flash off camera Priority setting
Use flash fill Aperture Priority
Use flash with modifier (Bounce card, bank or ceiling) Priority setting.

Layout your best result from each of the 4 techniques, write down your camera settings for each photograph and post as a single entry.